> ## Documentation Index
> Fetch the complete documentation index at: https://docs.benefitflow.com/llms.txt
> Use this file to discover all available pages before exploring further.
# CRM Integrations: Getting Started
## How to connect BenefitFlow to your CRM and sync your first list
### How to Connect BenefitFlow to Your CRM (Salesforce, HubSpot, or Dynamics)
BenefitFlow offers seamless, native integrations with **Salesforce**, **HubSpot**, and **Microsoft Dynamics**, enabling you to push detailed records (**Employers, Contacts, Brokers, and Broker Office Locations**) directly into your CRM with minimal setup.
**Before you start the setup process:**
Ensure you are both a **BenefitFlow Admin** and either a **Salesforce, Dynamics, or HubSpot Admin** with **read/write access** to relevant CRM fields.
### Integration Setup Steps
* **Accessing Integration Settings**
1. Log in to your BenefitFlow account.
2. In the upper-right corner, click your **name** and select **Integrations**.
3. On the Integrations page, choose **Salesforce**, **HubSpot**, or **Microsoft Dynamics** to begin connection.
* **Connecting to Salesforce**
* Use **1-click authentication** for quick setup (recommended for most customers), or
* Use **Manual Credentials Entry** for advanced/custom setups (refer to the [Manual Setup Guide](/knowledge-base/salesforce-integration-setup-instructions) for details).
* **Sandbox support** is available if you’d like to test before syncing to production.
* **Connecting to HubSpot**
* Use our **1-click authentication** to connect instantly.
* **Sandbox environments** are also supported for safe testing.
* **Connecting to Microsoft Dynamics**
* Requires creating an Azure App Registration and Power Platform Application User.
* Refer to the [Dynamics Setup Guide](/knowledge-base/dynamics-integration-setup-instructions) for detailed instructions.
### Mapping Fields Between BenefitFlow and Your CRM
Once connected, configure your integration by mapping key fields between platforms:
* Click **Integration Settings**
* Use **Add Field Mapping** to:
* Select a **BenefitFlow field**
* Choose a corresponding **CRM field**, or use a constant/custom value
* Define whether the field can **overwrite** existing values or update only if empty
* Click **Save Changes** to finalize
Mappings can be customized for:
* **Employer vs. Broker data**
* **Accounts vs. Child Accounts vs. Contacts**
For the full list of BenefitFlow fields available in each object, see the [Field Mapping Reference](/knowledge-base/crm-field-mapping-reference).
### Configuring Sync Permissions (Optional)
After setting up your field mappings, you can optionally configure what sync operations standard users are allowed to perform:
* Click **Integration Settings**, then select the **Preferences** tab
* Under **Sync Permissions for Standard Users**, choose a permission level for **Accounts** and **Contacts**:
* **Create new and update existing**
* **Create new only** (default)
* **Update existing only**
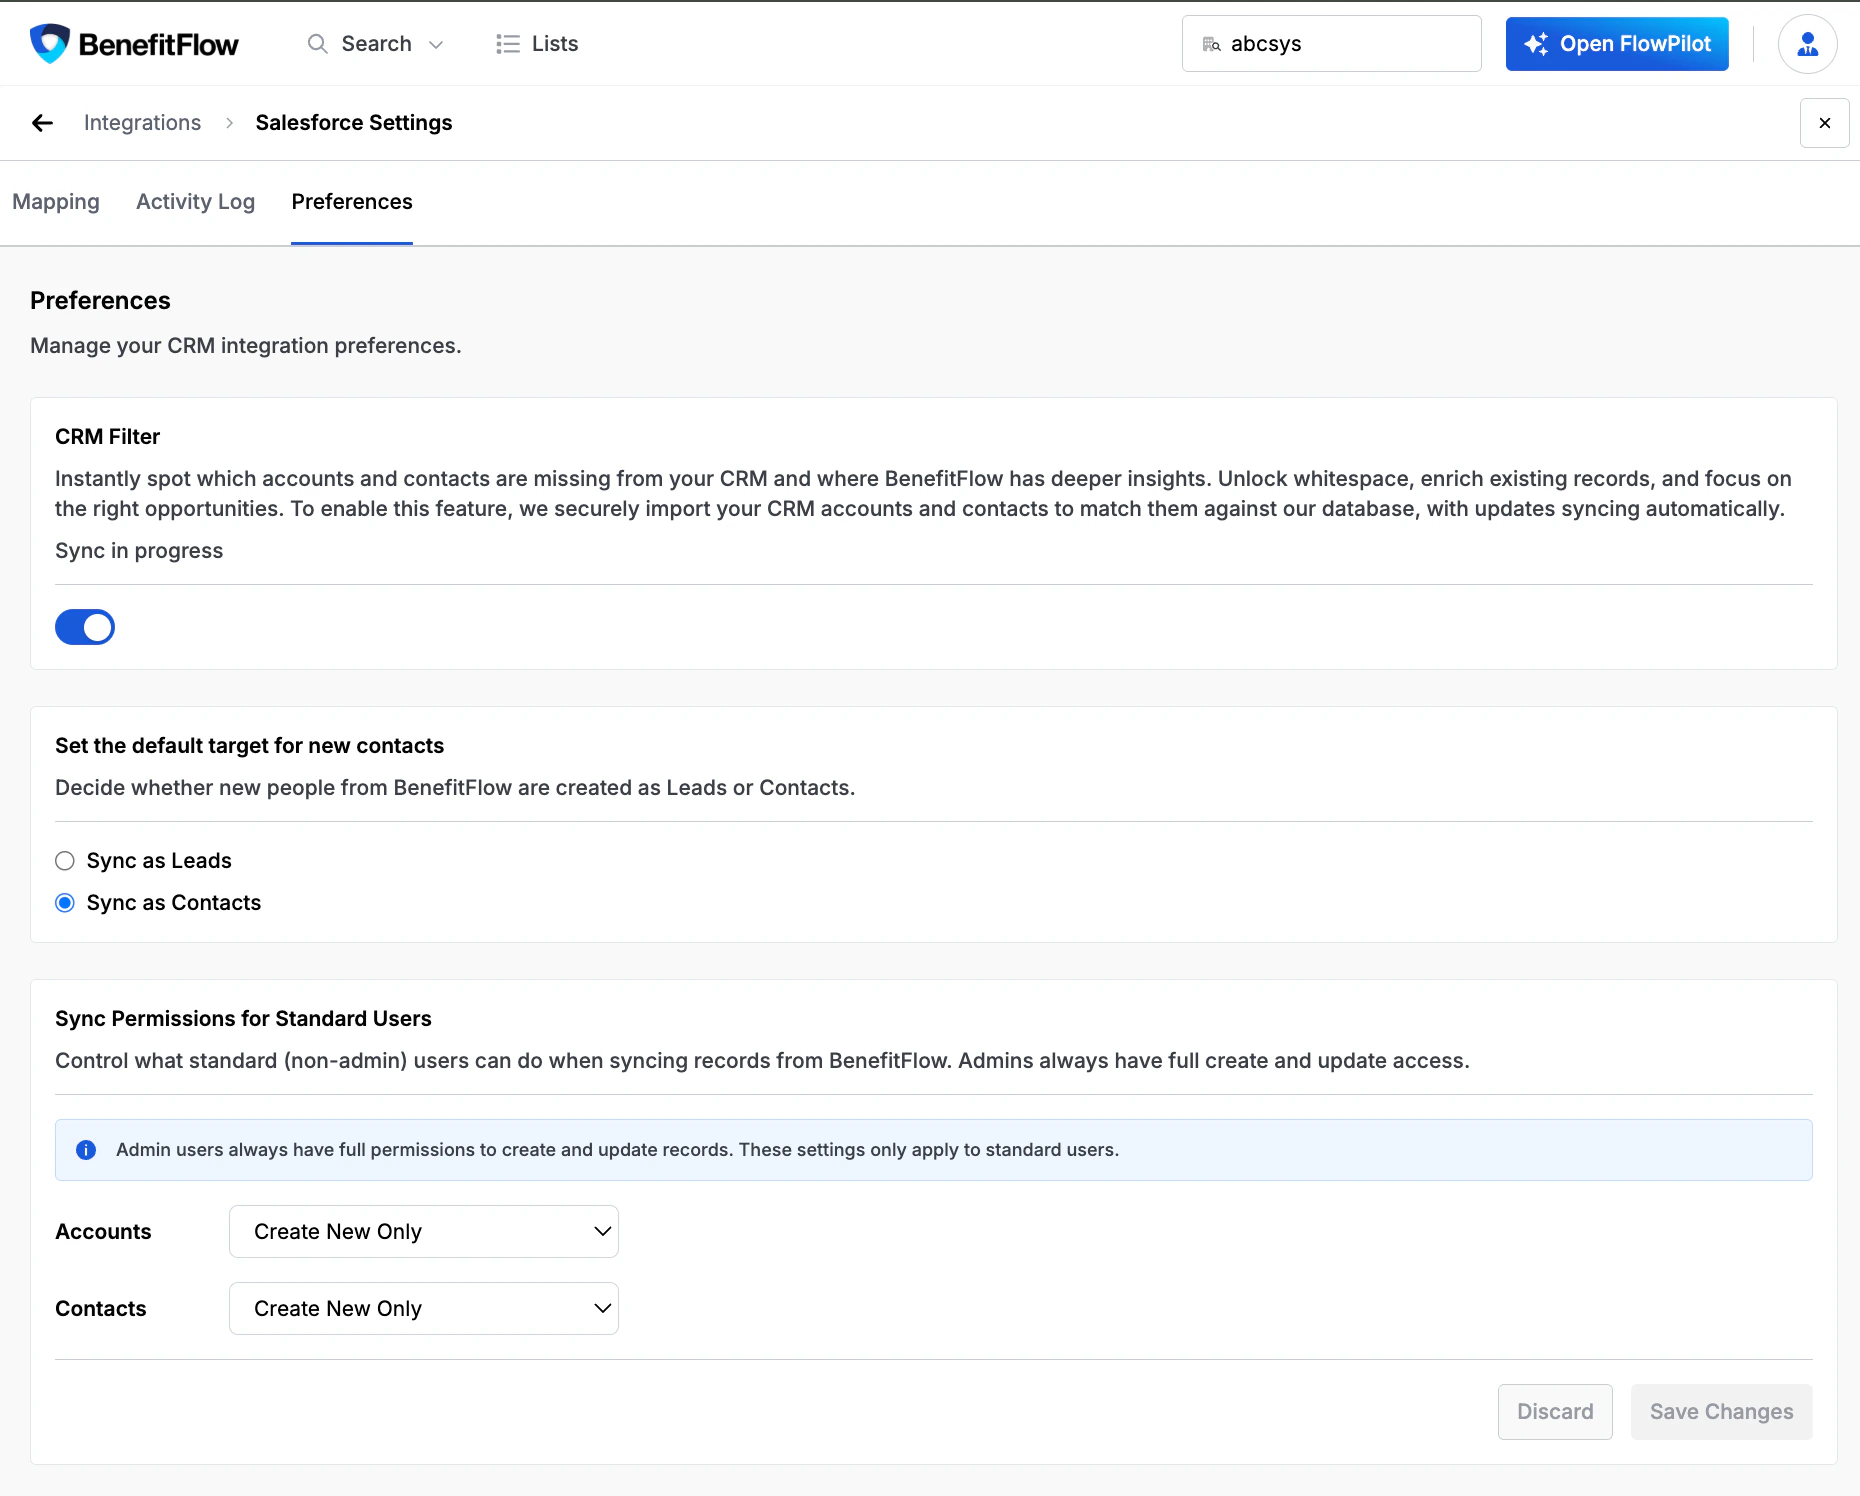 By default, standard users can only create net-new records — this matches BenefitFlow's previous behavior. Admin users always have full sync access regardless of this setting.
### Syncing Data to Your CRM
* Navigate to the **Lists** tab
* Choose a list (e.g., Brokers, Broker Contacts, Employers, Employer Contacts)
* Click **Sync** on the list to initiate
**Smart Sync Logic:**
* ✅ **Net-New**: If the record doesn’t exist in your CRM, BenefitFlow adds it
* 🔁 **Update**: If the record exists, only approved mapped fields are updated
* ✔️ **Synced**: If no changes are needed, the record is marked as synced
**Additional Tools:**
* Use **Assign Owner** to manually reassign CRM record ownership
* Push records **one-by-one** or **bulk sync** your entire list using **“Sync to CRM”**
### Post-Sync Actions
Once synced, you can:
* Click into a record from BenefitFlow to view it directly in your CRM
* Verify updates went through as expected
* Continue refining field mappings as your CRM evolves
### Need Help?
Contact [customerteam@benefit-flow.com](mailto:customerteam@benefit-flow.com) for hands-on support.
By default, standard users can only create net-new records — this matches BenefitFlow's previous behavior. Admin users always have full sync access regardless of this setting.
### Syncing Data to Your CRM
* Navigate to the **Lists** tab
* Choose a list (e.g., Brokers, Broker Contacts, Employers, Employer Contacts)
* Click **Sync** on the list to initiate
**Smart Sync Logic:**
* ✅ **Net-New**: If the record doesn’t exist in your CRM, BenefitFlow adds it
* 🔁 **Update**: If the record exists, only approved mapped fields are updated
* ✔️ **Synced**: If no changes are needed, the record is marked as synced
**Additional Tools:**
* Use **Assign Owner** to manually reassign CRM record ownership
* Push records **one-by-one** or **bulk sync** your entire list using **“Sync to CRM”**
### Post-Sync Actions
Once synced, you can:
* Click into a record from BenefitFlow to view it directly in your CRM
* Verify updates went through as expected
* Continue refining field mappings as your CRM evolves
### Need Help?
Contact [customerteam@benefit-flow.com](mailto:customerteam@benefit-flow.com) for hands-on support.