

Overview
Configurable CRM Matching lets BenefitFlow honor non-standard CRM configurations where the same Contact or Account can legitimately exist multiple times — once per record owner. Instead of treating an email likejoe@mercer.com as a single Contact, BenefitFlow can recognize joe@mercer.com owned by Producer A and joe@mercer.com owned by Producer B as two distinct records, and sync each user’s data into their own owned version.
This guide covers:
- How owner-based matching changes day-to-day behavior
- How each user sets their CRM Identity before syncing
- A recommended approach for end-to-end testing in your sandbox
- Frequently asked questions about matching rules, field mappings, and connection setup
How owner-based matching works
In a standard CRM integration, BenefitFlow uses a single key (typically email for Contacts, website for Accounts) to identify whether a record already exists in your CRM. With owner-based matching enabled, BenefitFlow extends that key with the record’sOwnerId. The result:
- Two BenefitFlow users syncing the same Contact will produce two separate Contact records in your CRM, each owned by the respective user
- A user’s sync only sees and updates records they own
- Net-new vs. update detection is calculated per owner, not globally
Setting your CRM Identity
Before any user can sync data with owner-based matching, they must link their BenefitFlow account to their CRM user. This is a one-time setup per user.1
Find the warningUntil your CRM Identity is configured, BenefitFlow displays a yellow banner on list pages and Integration Settings. All sync actions are blocked while this banner is visible.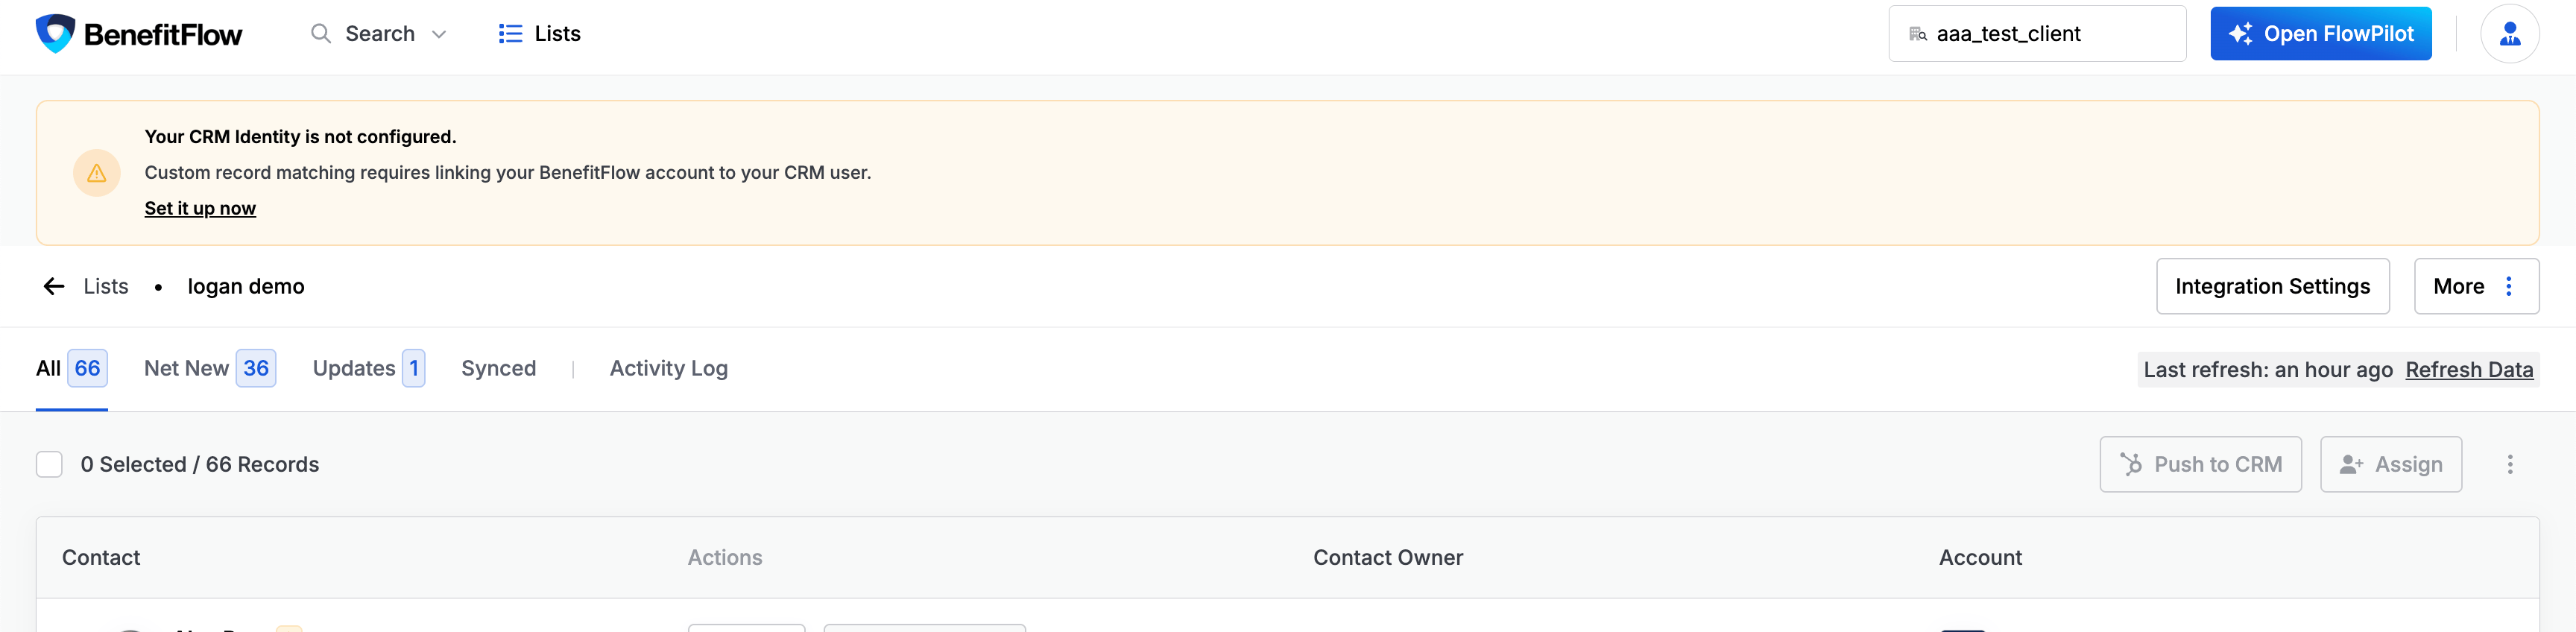
2
Open the My CRM Identity pageClick Set it up now in the banner, or navigate via the user menu in the top-right corner and select My CRM Identity.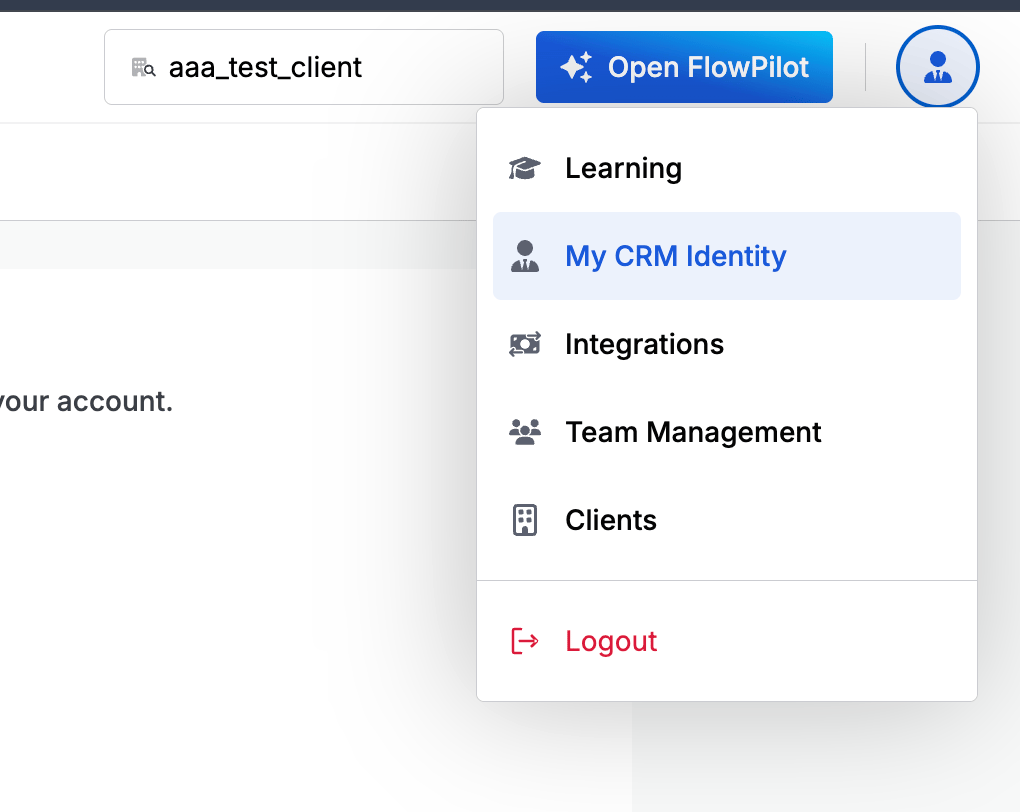
3
Confirm the suggested CRM userBenefitFlow will pre-select a CRM user that matches your BenefitFlow email. Review the suggestion in the Your CRM User dropdown — if it’s correct, click Save. If you need a different user, change the selection from the dropdown first.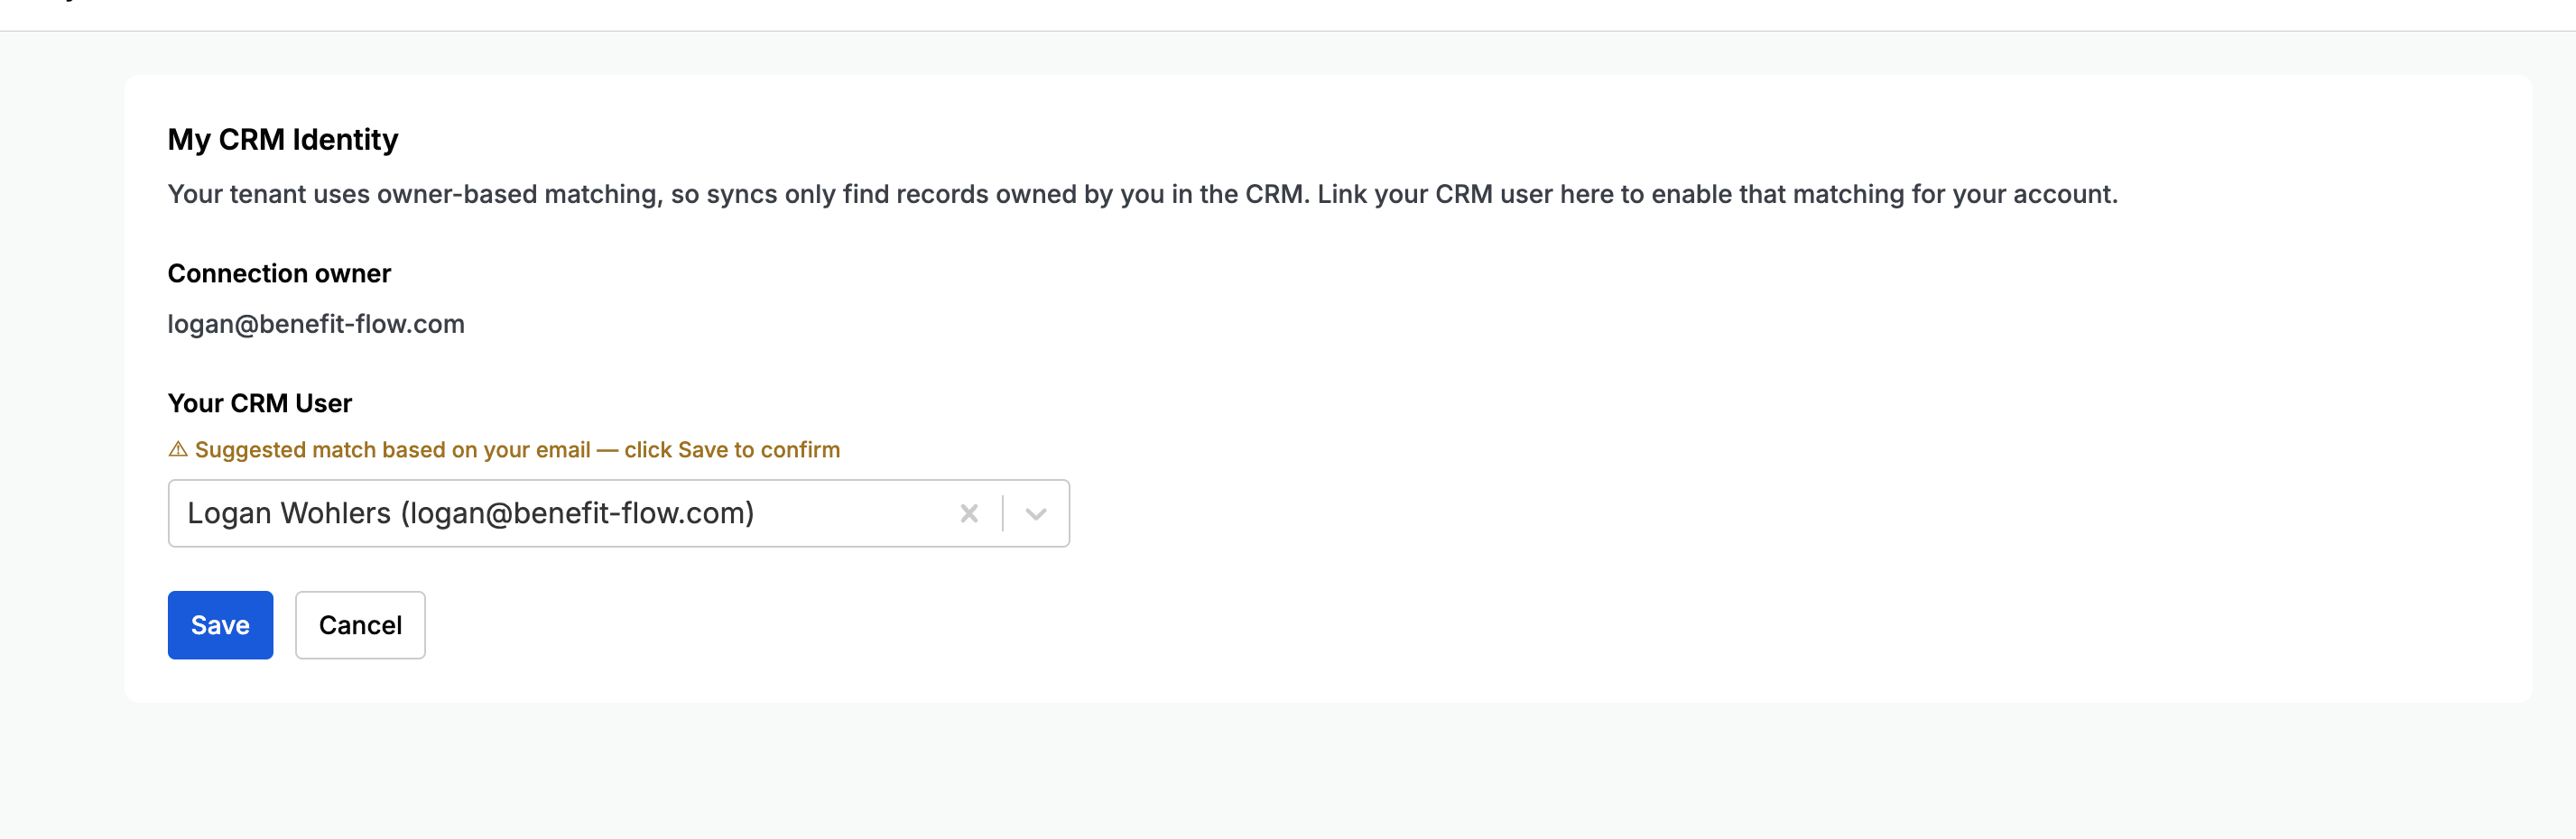
4
Verify the confirmed stateAfter saving you’ll see a green confirmation reading “Currently linked to [your CRM user]”, a “Settings Updated” toast, and the warning banner will disappear. Sync actions are now unlocked.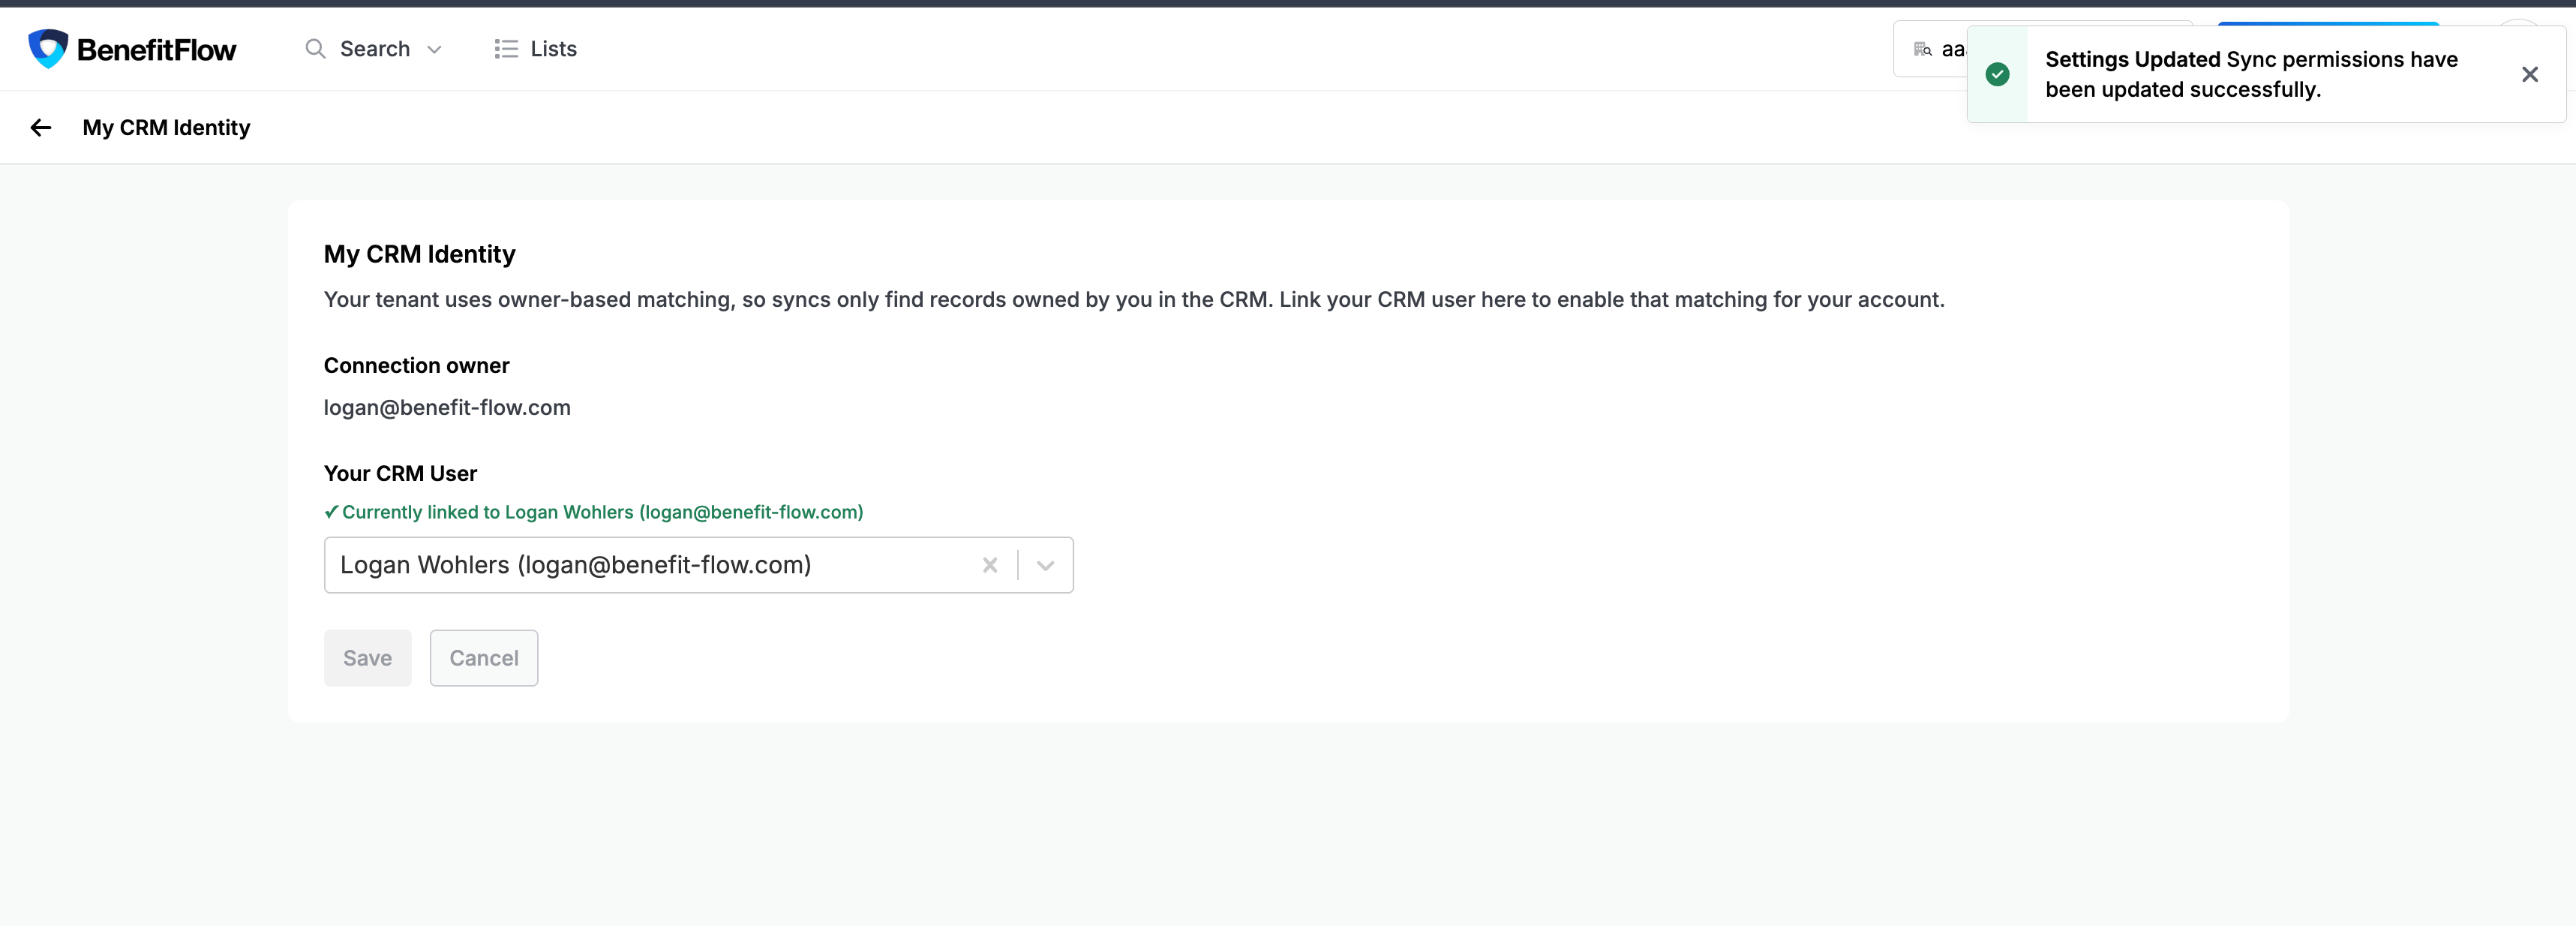
Testing guide
We recommend validating Configurable CRM Matching in your CRM sandbox before promoting to production. The core behavior to verify is that the same BenefitFlow record syncs as separate, owner-delineated records in your CRM when pushed by different users.Prerequisites
Before testing, confirm the following:- BenefitFlow accounts are provisioned for the team members participating in testing
- At least two CRM test users are available, with credentials your team can sign in as
- A CRM sandbox connection is configured in BenefitFlow’s Integration Settings
- Field mappings (Account, Contact) are reviewed and approved by your CRM admin
- Each test participant has set their CRM Identity (see above) before testing
Recommended testing approach
The high-level approach we walk through with customers:1
Build a small test list in BenefitFlowCreate a list of a small sample of Companies (Accounts) and Contacts in BenefitFlow. The size of the sample is up to you — a list large enough to spot patterns but small enough to inspect manually (typically 5–25 records of each type) is a good starting point.
2
Have User A sync the listSign in as the first test user, set their CRM Identity if not already done, and sync the test list to your CRM sandbox. Confirm in the sandbox that records appear and are owned by User A.
3
Have User B sync the same listSign in as the second test user, set their CRM Identity, and sync the same exact list from BenefitFlow to your CRM sandbox.
4
Verify the expected outcomeInspect your CRM sandbox. For each record in the test list, you should see two versions — one owned by User A and one owned by User B — with identical contact or account fields but distinct
OwnerId values.What to verify
FAQs
Who can change the matching rules?
Who can change the matching rules?
Default matching criteria can only be modified by BenefitFlow Admin or Support staff. If your CRM has a non-standard configuration that requires a custom approach, your BenefitFlow contact will work with you to set this up.
What happens if a user tries to sync without setting their CRM Identity?
What happens if a user tries to sync without setting their CRM Identity?
The sync is blocked. Users will see a yellow warning banner on list pages and Integration Settings, and a toast notification when they attempt to push records. The block is also enforced on the backend — even if the warning is dismissed visually, sync requests will return an error until the user’s CRM Identity is configured.
Which CRM objects does BenefitFlow write to?
Which CRM objects does BenefitFlow write to?
BenefitFlow writes to Contacts and Accounts only. We do not write to any other CRM objects. We also read from your CRM’s Users table so we can determine the correct
OwnerId to assign to each record.Are Salesforce Record Types required?
Are Salesforce Record Types required?
No. Record Type is optional. Some customers use it to cleanly separate Contacts and Accounts along the Broker / Employer record types BenefitFlow uses, but it isn’t required for the integration to function.
How is the Date Last Updated field formatted?
How is the Date Last Updated field formatted?
The Date Last Updated field is sent as a date string in
MM/DD/YYYY format (for example, 12/11/2025). If you’ve configured the field as a Date or Date/Time type in your CRM, your CRM will parse the string accordingly.How does BenefitFlow connect to Salesforce?
How does BenefitFlow connect to Salesforce?
You can establish the Salesforce connection in either of two ways:
- One-click OAuth using the currently signed-in Salesforce user. Make sure the BenefitFlow admin establishing the connection is logged in as your Integrations User in Salesforce.
- Manual entry of Consumer Key and Consumer Secret for a Connected App you’ve created.
Do I need to map both 'Benefits Primary Broker' and 'Benefits Employer Primary Broker'?
Do I need to map both 'Benefits Primary Broker' and 'Benefits Employer Primary Broker'?
No. These fields contain the same data when only employer fields are being mapped. We recommend mapping Benefits Employer Primary Broker only. The other field is reserved for a future state where Broker records are also mapped.
What is the 'Benefits Phone Number' field for?
What is the 'Benefits Phone Number' field for?
Benefits Phone Number on the Account/Contact page layout refers to the phone number for the employer’s benefits broker. If you choose to push Broker data through the integration in the future, this field can be used for that data.
Will my CRM Identity selection change anything beyond matching?
Will my CRM Identity selection change anything beyond matching?
Yes — once configured, your BenefitFlow → CRM user link is also used to set the
OwnerId on new records you sync, so all records you push will be owned by your linked CRM user.Can the CRM Identity be changed later?
Can the CRM Identity be changed later?
Yes. Return to My CRM Identity at any time to change the linked CRM user. Existing records keep their original
OwnerId; only future syncs will use the updated identity.Need help?
If anything in your test results doesn’t match the expected outcome, or if you have questions about your CRM’s configuration, reach out to your BenefitFlow contact. We recommend including:- The list name or ID being tested
- Which test user performed the sync
- A description of what you expected vs. what you saw in the CRM